
You’ll want to level your camper or RV as soon as you arrive at your campsite to guarantee your appliances function properly and prevent potential damage to the structure. Choose a relatively level spot and gather essential tools like leveling blocks, a bubble level, and wheel chocks. Level your camper side to side before stabilizing the rear wheels, and use a bubble level to assess the position. Mastering the leveling process takes some practice, but with the right techniques, you’ll be a pro in no time and enjoy a safe and comfortable stay.
Summary
- Choose a campsite with a relatively level surface to minimize adjustments and ensure proper appliance function.
- Gather essential tools: leveling blocks, bubble level, wheel chocks, and stabilizing jacks for accuracy and stability.
- Level the camper side to side before stabilizing rear wheels to achieve overall balance and comfort.
- Position the RV with front wheels facing downhill for easier adjustments and observe surrounding features to avoid obstructions.
- Recheck levels after adjustments to confirm stability and ensure appliances work efficiently, and make further adjustments as needed.
Preparing for Leveling
Selecting the right campsite is the first essential step in preparing for leveling your camper or RV. You’ll want to choose a relatively level site to minimize the need for adjustments and guarantee safety during setup. Before you begin, gather your essential tools, including leveling blocks and a reliable bubble level. Make sure to uncouple your trailer from the tow vehicle to allow for manual leveling adjustments. Use your bubble level to assess the slope of the campsite, aiming for a maximum grade of 3% to 5%. This will guarantee safe parking and make the leveling process much easier. With the right site and tools, you’ll be well-prepared to start leveling your camper or RV.
Essential Equipment for Leveling
You’ll need the right tools to level your camper or RV efficiently, and that starts with choosing the best leveling tools and aids for the job. Leveling blocks and pads are must-haves, providing the necessary support and stability to keep your RV level and secure. As you shop for blocks and pads, consider the various options available and how they suit your specific RV’s needs.
Leveling Tools and Aids
When it comes to leveling your RV, having the right tools for the job is vital. You’ll need leveling tools like bubble levels, graduated RV levels, or smartphone apps such as LevelMatePRO to guarantee accuracy. These tools help you determine the best way to level your RV, side-to-side and front-to-back. Stabilizing jacks are also essential, but they should not be relied upon for the initial leveling process. Instead, they enhance stability once the RV is leveled. Additional equipment like wooden blocks or manufactured leveling wedges can provide flexibility in addressing different ground conditions. With the right leveling tools, you’ll be able to level your RV efficiently and ensure peak functionality. Effective leveling also prevents issues with your RV’s systems and appliances.
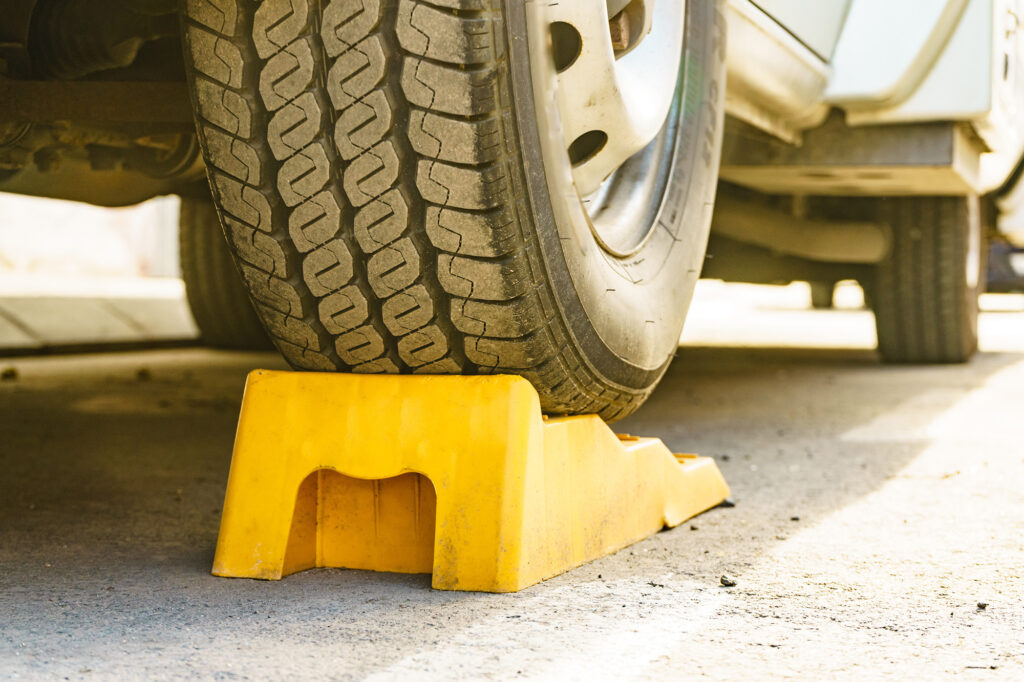
Blocks and Pads Options
Leveling tools are only half the equation when it comes to achieving perfect balance; you also need the right equipment to support them. That’s where leveling blocks and jack pads come in. Leveling blocks are a must-have for raising the low side of your RV, and you’ll want to opt for durable plastic options over wood for longevity and easy storage. Make sure they’re wider than your trailer tires for maximum stability. Jack pads provide a stable foundation for your stabilizing jacks on soft ground, preventing sinking and damage. Consider a set that includes matching wheel chocks to keep your RV from rolling. A variety of block sizes will give you the versatility to tackle different campsite conditions. With the right blocks and pads, you’ll be leveling like a pro in no time.
Steps to Level Your Camper or RV
You’ll want to start by choosing the right campsite, looking for a spot that’s as level as possible to make the leveling process easier. Next, you’ll use a bubble level tool to assess the camper’s position and determine which adjustments need to be made to get it level. By following a few key steps, including leveling side to side and stabilizing your rear wheels, you’ll be able to get your camper or RV level and secure.
Choose the Right Site
One essential step in guaranteeing a smooth and safe camping experience is selecting a campsite with a relatively level surface. When you choose the right site, you’ll save time and effort in the leveling process.
You’ll want to take into account the following:
- Choose a site with a maximum slope of 3% to 5% for safe parking and easier leveling.
- Check the terrain for soft or uneven ground that may require leveling blocks or plywood for support.
- Position your RV with the front wheels facing downhill to facilitate auto-leveling systems or to make manual adjustments easier.
- Avoid slopes exceeding a 10% grade, as they pose significant safety risks and can lead to damage.
- Observe surrounding features like trees and structures to guarantee they won’t obstruct the RV’s leveling process or pose hazards during setup.
Use Bubble Level Tool
As you prepare to level your camper or RV, park it on a relatively even surface to minimize the adjustments needed later. Now it’s time to use a bubble level tool to check the accuracy of your RV’s position. Place the bubble level on a flat surface inside the RV to check the front-to-back level. You’ll check the side-to-side level separately. If the bubble level indicates that the RV is not level, you’ll make adjustments to achieve the desired balance. The bubble level is an essential tool in leveling your RV, ensuring you get an accurate reading of your RV’s position. By using a bubble level, you’ll be able to make the necessary adjustments to get your RV level and stable.
Level Side to Side
Because leveling side to side is the first step in achieving overall balance, it’s essential to get it right. You’ll want to start by parking your RV on relatively even ground to minimize adjustments needed. To level side-to-side, follow these steps:
- Park on even ground to reduce adjustments
- Use a bubble level on the RV’s floor to check for side-to-side level
- Place leveling blocks under the low side tires to raise that side until level is achieved
- Drive the RV onto the blocks slowly, ensuring they don’t shift
- Double-check the bubble level to confirm the RV remains even
Stabilize Rear Wheels
Now that you’ve leveled your RV side to side, focus on securing the rear wheels to guarantee overall stability. Before stabilizing the rear wheels, double-check that your RV is leveled correctly front-to-back using a bubble level or leveling app. Once level, place wheel chocks on the rear wheels to prevent rolling while deploying stabilizer jacks. Extend the stabilizer jacks until they reach the ground and fit snugly without lifting the RV. This provides additional support without altering the level. If you’re parked on soft ground, consider using jack pads beneath the stabilizer jacks to distribute weight and prevent sinking. By following these steps, you’ll be able to level your RV effectively and ascertain a stable setup.
Manual Adjustments Needed
While automatic leveling systems can simplify the process, there are times when manual adjustments are necessary to achieve ideal results. Manual leveling requires attention to detail, especially when adjusting side to side. You’ll need to:
- Park your RV on a flat area and check the front-to-back level using a bubble level.
- Use leveling blocks under the low side of the RV to achieve side-to-side balance.
- Adjust the blocks as needed to guarantee the RV is stable.
- Deploy stabilizing jacks to reduce wobbling, but avoid lifting the RV.
- Recheck the bubble level after making adjustments to confirm the RV is level in both dimensions.
Safety Considerations and Slope Angles
As you prepare to level your RV, understanding the importance of safety considerations and slope angles is crucial to guarantee a stable and secure setup. You’ll want to choose a spot with a slope angle that’s within your RV’s recommended range. Typically, it’s safe to park on slopes with a 3% to 5% grade, but exercise caution on slopes between 5% and 10% grade, as they can pose safety risks and affect leveling systems. Never park on slopes exceeding a 10% grade, as this increases the likelihood of the RV rolling and compromises safety. Always consult your RV manufacturer’s recommendations for specific slope guidelines and limitations based on your vehicle’s capabilities to guarantee a safe and effective leveling process.
Tips for Successful Leveling and Maintenance
Because proper leveling is crucial to the overall safety and functionality of your RV, prioritizing it before stabilizing is imperative to guarantee your appliances, such as refrigerators and toilets, work efficiently. To level your trailer successfully, consider the following tips:
- Always prioritize leveling before stabilizing to guarantee proper functioning of appliances
- Invest in quality leveling blocks and wheel chocks for better support and stability
- Regularly inspect and maintain your leveling equipment, including jacks and blocks
- Use a reliable bubble level or RV leveling app to accurately check and adjust levels
- Familiarize yourself with safe slope angles to prevent safety risks and guarantee the integrity of your RV’s structure during parking. Effective rv leveling guarantees a comfortable stay.
Frequently Asked Questions
What Is the Easiest Way to Level a Camper?
You’ll find the easiest way to level a camper is using leveling blocks, which you can place under the low side tires to raise it until it’s level, checking with a bubble level for accuracy.
Does a Camper Need to Be Perfectly Level?
You don’t need to get your camper perfectly level, a slight tilt of up to 3% to 5% grade is generally acceptable for most RV operations, including refrigerator and toilet functionality, and won’t cause significant issues.
What Happens if Your RV Isn’t Leveled?
If your RV isn’t leveled, you’ll face issues like appliance malfunctions, slide damage, drainage problems, and jammed doors and cabinets. You’ll also compromise safety and stability, increasing the risk of accidents while parked.
Can You Add Self-Leveling to a Camper?
You can add self-leveling to a camper by installing a hydraulic or electric leveling system, which automatically adjusts to achieve a level position, but this typically requires some mechanical knowledge or professional assistance.